Have you ever wondered how system administrators can easily access the servers that are located in other parts of the world without incurring any risk of data insecurities?
Here, SSH (Secure Shell) steps in. It is among the rules of TCP/IP networking by which you can communicate with remote PCs without any threat.
Unlike its predecessor, SSH encrypts traffic and supports any form of authentication. Such features have rendered it a requirement for most administrators and advanced users.
This article explores Secure Shell (SSH), shows its applications, and explains how to connect to a server using SSH.
What is the SSH Protocol?
In simple words, Secure Shell (SSH) technology provides the possibility of establishing a secure connection with remote systems, such as a VPS server or a dedicated server.
SSH encrypts remote log-ins, command-line interactions, file transfers, and network application tunnels. Administrators and developers widely use SSH in server administration, remote system management, and process automation, ensuring secure operations.
Tatu Ylonen developed Secure Shell (SSH) in 1995 as an alternative to earlier and insecure protocols such as Telnet and Rlogin, where the data (including passwords) was transmitted in plain text.
Common Uses of SSH
The use of SSH protocols is relatively widespread. Most often they are used to:
- Work on remote machines.
- Use of remote databases.
- Configuring a remote router or server.
- Operation of the WWW server,
using e-mail. - Secure file transfer (using additional protocols).
- Tunneling of any TCP connections.
How SSH Protects Your Connection
The SSH protocol will allow you to prevent dramatic attacks on your terminal session:
- DNS spoofing (spoofing the DNS server).
- IP source routing (impersonating a trusted system).
- IP spoofing (impersonation of the remote target server).
- Passwords hijacking (interception of passwords).
- Sniffing (eavesdropping) and spoofing (adulteration) sessions.
Methods of Connecting via Secure Shell (SSH)
The Secure Shell (SSH) connection protocol aims to provide security of the connection with the server. Normally, the connection can be set in two ways:
- Key authorization: With the use of a special file of an equally great set of characters (a personal key corresponding to the one it has on the server).
- Password authentication: Popular use of a user data pair (traditional idea).
Managing a set of keys allows you to eliminate problems related to passwords. It also allows you to simplify connections and execute commands using one key. You can connect to several servers. Access via SSH is possible from any operating system.
Connecting to SSH on Linux
If you are using Linux, it is enough that you enter the command ssh terminal, you enter your username and hostname / IP address of the server, or in accordance with an ssh
root@example.com or ssh root@127.0.0.1
Connecting to SSH on Windows (Using PuTTY)
In the Windows operating system, to log in to the SSH server, a free SSH client can be used by the name of PuTTY.
Download URL: https://www.chiark.greenend.org.uk/~sgtatham/putty/latest.html
Steps to Connect with PuTTY
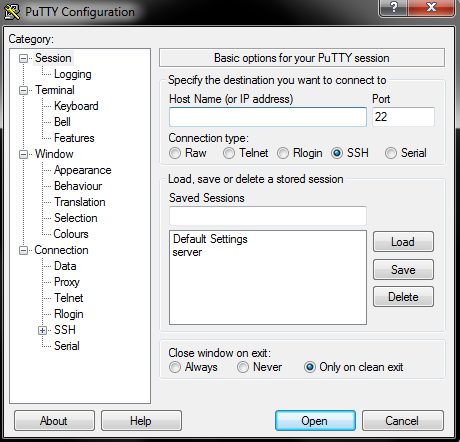
Once the program is launched, a dialog box will appear, and the fields to fill in:
- Host Name (or IP address) – enter the server host name or IP address to which you want to connect.
- Connection type – select the SSH option.
On the Logging tab (one of the bar items on the left side of the screen), check the option Logging turned off completely and Ask the user every time.
In the Terminal tab, select:
- Auto wrap mode is initially on.
- Use background color to erase the screen,
- Local echo – Auto,
- Local line editing – Auto.
Make sure that the data entered is correct, and then click Open to initiate the connection. The console window will be displayed on the screen. Enter your login and password in it. In the “login as” field, enter the name of the user you want to log in to and click “enter“.
After displaying the “password” field, enter the account access password and click the “enter” button.
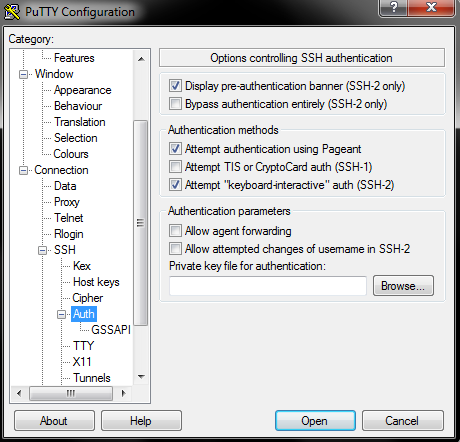
Connecting with an SSH Key in PuTTY
Alternatively, if the server administrator made it possible for you to log in after the key (i.e., placed your public key on the server in the correct file with the authorization keys on the server), attach the private key file before you start the connection. In the Putty program, you do it from the menu on the left: Connection → SSH → Auth.
Successful Secure Shell Login
The system displays the last login date on the screen, confirming that the connection has been established. Congratulations, now you can work on the server through the Secure Shell protocol.
After patiently going through all the stages, you will certainly be able to install Putty yourself and start working. Check the link below and find a coupon for a 10% off on a VPS hosting. Use or share with your friends!
Wrap-Up
In conclusion, the SSH protocol is an indispensable method of communication through networks with a secure connection. Its encrypted data, authentication protocols, and the ability of versatile usage in remote administration, file transfers, and secure tunneling are what make it the industry standard in remote administration, file transfers, and secure tunneling.